Our FAQs are designed to give you an overview of solar technology, solar installation, and solar economics,
so you’ll have the confidence to go solar.
Don’t see an answer you’re looking for here?
Contact Us
Solar panels are made up of photovoltaic (PV) cells made of silicon. When the sun’s rays hit them, these cells convert sunlight to electricity. Individual cells are wired together to form a solar panel. Panels are typically three feet by five feet. They are coated in tempered glass, which allows them to withstand harsh weather.
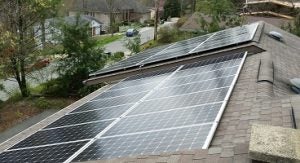 The electricity produced by a single solar panel is not enough to power a home or business, so multiple solar panels are needed. The number of panels varies by installation, but every solar system (also called an “array”) will include a series of panels mounted and wired together. This array may be installed on a roof (“rooftop solar”) or on the ground-level (“ground-mounted solar”).
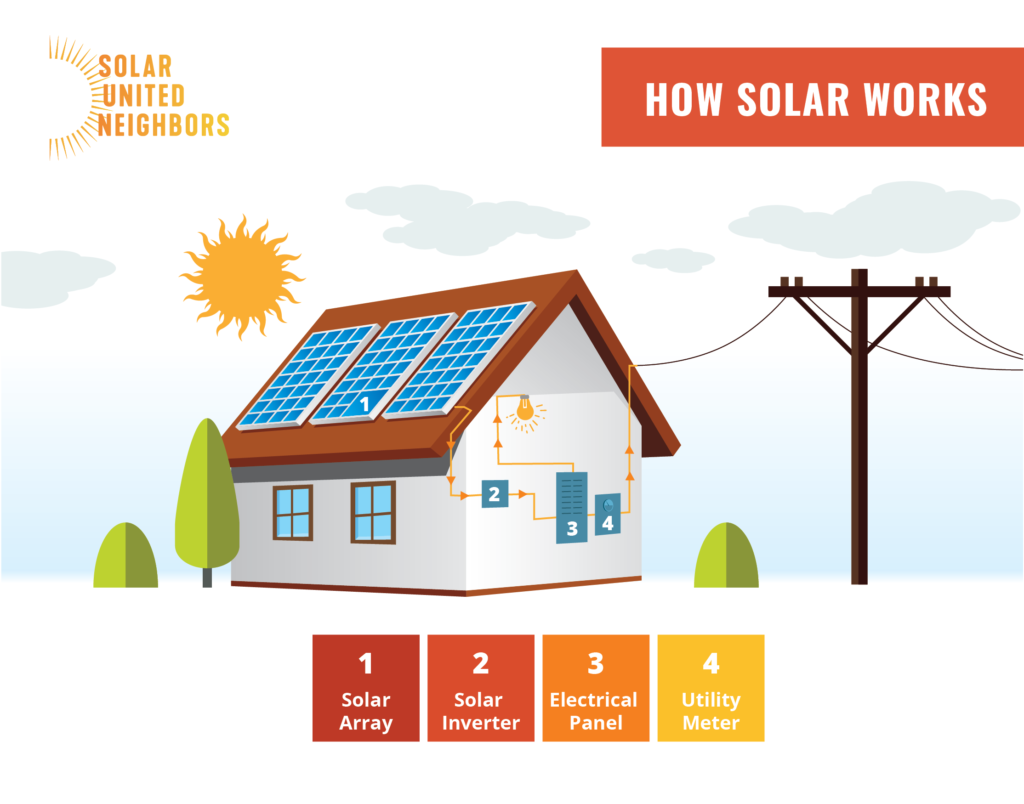
The electricity generated by solar panels takes the form of direct current (DC). However, most appliances and electricity-consuming objects (called “electric load”) require alternating current (AC). To convert the solar electricity from DC to AC, an inverter is needed. You will need to choose between two types of inverters: a central inverter and microinverters. While both perform the task of converting electricity from DC to AC, they differ in critical ways.

A central inverter receives all of the electrical output of your entire solar system and converts it from DC to AC at a single, central location. A single central inverter is required for a solar system. It is often mounted on the side of your home or building next to your electric meter. Central inverters are steadfast and affordable, but they are susceptible to variations in panel performance. If one panel is shaded and produces less electricity than the others, the total electrical output will drop.
If shading is of concern, microinverters or DC optimizers can help maximize production. Unlike central inverters, microinverters and DC optimizers individually mount to the backside of each individual solar panel. They capture the electricity that flows off of each panel. DC optimizers work with a central inverter that converts DC to AC. Microinverters convert DC immediately to AC right under the panel. With either DC optimizers or microinverters, if one panel is shaded, it will not affect the output of the whole array. By design, both DC optimizers and microinverters help maximize the conversion of electricity and are useful in situations with variable shading. What’s more, because they allow each panel to operate independently of one another, both make it easy to add more panels to a solar array in the future.
Once electricity is produced by the solar panels and converted from DC to AC by the inverter(s), it will flow through your electric meter and into your home or building. It will be used on site the moment it is created. Any excess will flow back out through your electric meter and onto the local grid.
Think of your solar array as a 25-year investment. Solar panels will produce electricity for at least 25 years. (See “Do systems come with warranties?” question for information on the warranties you’ll receive with your system) Panels will continue to generate electricity after 25 years, but at a decreasing rate. While microinverters will likely last for the duration of the PV system, you may need to replace central inverters after 15 years.
You will earn credit for the solar electricity you generate through a policy called net metering. Net metering allows you to offset your utility electricity consumption with the solar electricity your array produces. When your system generates electricity, that electricity flows into your home or building and is consumed on-site. When your solar panels produce more electricity than your home or building needs, the excess electricity is sent out to the local grid, where it is consumed by your neighbors. Through net metering, you receive full credit for the excess electricity you feed onto the grid. Once you install solar, your monthly electric bill will be calculated to reflect: the total amount of electricity you consumed minus the total amount of electricity you produced (i.e., the solar electricity you fed onto the grid).
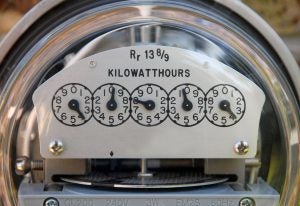
It is common for solar arrays to produce surplus electricity during certain times of the day, months, or seasons. Consider, for example, a sunny summer day. Your panels will produce a high volume of solar electricity during the day, but you are likely away from home and not consuming any of that electricity. In that case, the solar surplus will flow back out to the grid. Net metering enables you to receive credit for these seasonal or daily surpluses. Your utility will then apply those credits to your monthly bill, covering the electricity you purchase at night or during periods of low solar production. Should you have excess credit at the end of a billing cycle, you’ll be able to roll it over to the next month.
By allowing you to offset your utility electricity consumption with your solar electricity production, net metering helps you reap the full financial value of your solar array. Most states have passed laws enabling net metering. If you live in a state with net metering legislation, you are guaranteed the right to net metering, regardless of where you live or who your utility company is. Learn more about state-specific net metering laws.
Solar is a simple, minimum-maintenance technology. Unlike other energy technologies, solar PV contains no moving parts. This means it’s not likely your equipment will fail. You should not have to replace your panels at all during their lifetime. Wiring is the part of solar PV that most commonly requires maintenance because squirrels and other animals may tamper with it. Depending on your inverter type, you may also need to have your inverter replaced 10 to 12 years after installation. Extended warranties can cover this equipment replacement cost. Ask your installer for details.
In most cases, solar panels do not need to be washed, as rain and snow naturally clean them. In areas with less rain and lots of dust or pollutants in the air, occasional cleaning may improve performance. We do not recommend climbing up to your panels to wash them. If you live in an area where cleaning is needed, contact a solar professional.
Even though solar is low maintenance, we recommend asking your installer or another qualified solar professional to inspect your array every 3 to 5 years to make sure things remain in good operating order. They’ll do a visual inspection of all equipment, check for things like wire damage from critters, and make sure your system is performing properly.
Solar water heaters use the sun’s rays to generate thermal energy, or heat. The thermal energy heats up water, which flows into the home or building for later use. Solar United Neighbors supports the adoption of solar water heating, but does not include this technology in any of our co-op programming. We focus only on solar PV.
Yes, solar panels can be recycled. The Solar Energy Industries Association has put together a list of companies that provide this service.
We expect the options for panel recycling to increase in the coming years, but there will be challenges ahead. The solar industry is young and market for solar recycling is small. The cost to recycle components and materials from those panels is still high. Additionally, as the industry is getting better at using less expensive materials in solar production. While this has the benefit of lower the cost of solar panels. It also lowers the financial benefit of recycling them.
Governments and the solar industry will need to work together to ensure that solar panel materials are put back into the manufacturing stream. There are good examples of this happening in other more well-established industries. For example, 99% of car batteries are recycled. New automotive batteries are made primarily from recycled materials.
Solar panels can work for 25 years or more. The best way to help with the recycling challenge is to keep your system installed, operating, and making you money for as long as possible.
Solar panels can be installed on almost any kind of roof material and almost any roof structure (flat roof, pitched roof, etc.). Panels are attached to your roof with a racking system. The best racking system for your home depends on how your roof is structured and what type of roofing materials you have. Your installer will recommend the racking system most appropriate for your property.
Below are examples of the most common roof types on which people install solar and special racking considerations for each.
In some cases, your roof may not be suitable for solar. This can be due to obstructions on the roof (i.e., dormers, peaks, chimneys, HVAC vents, etc.), the roof’s integrity, shading, orientation, or other structural factors.
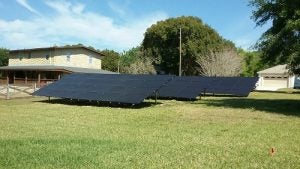 If your roof isn’t a good fit for solar, you may be able to install a ground-mounted system. For a ground-mounted system, you’ll need to have access to a clearing far away from trees and other objects that cast shadows. Most ground-mounted systems are composed of aluminum and stainless steel racking and are mounted on concrete footings in the ground.
If you cannot produce your own solar electricity on your roof or with a ground-mount, you may be able to purchase solar electricity from a community solar array. Learn more about community solar and see if it’s available where you live.
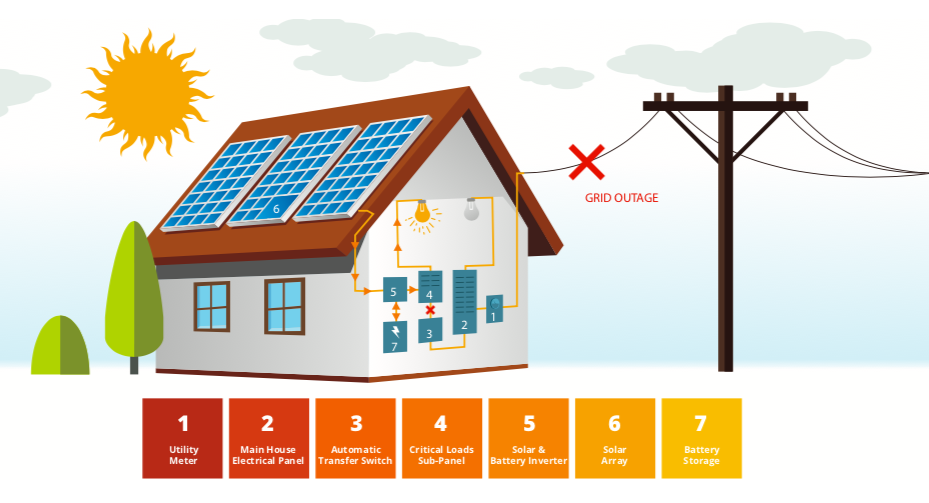
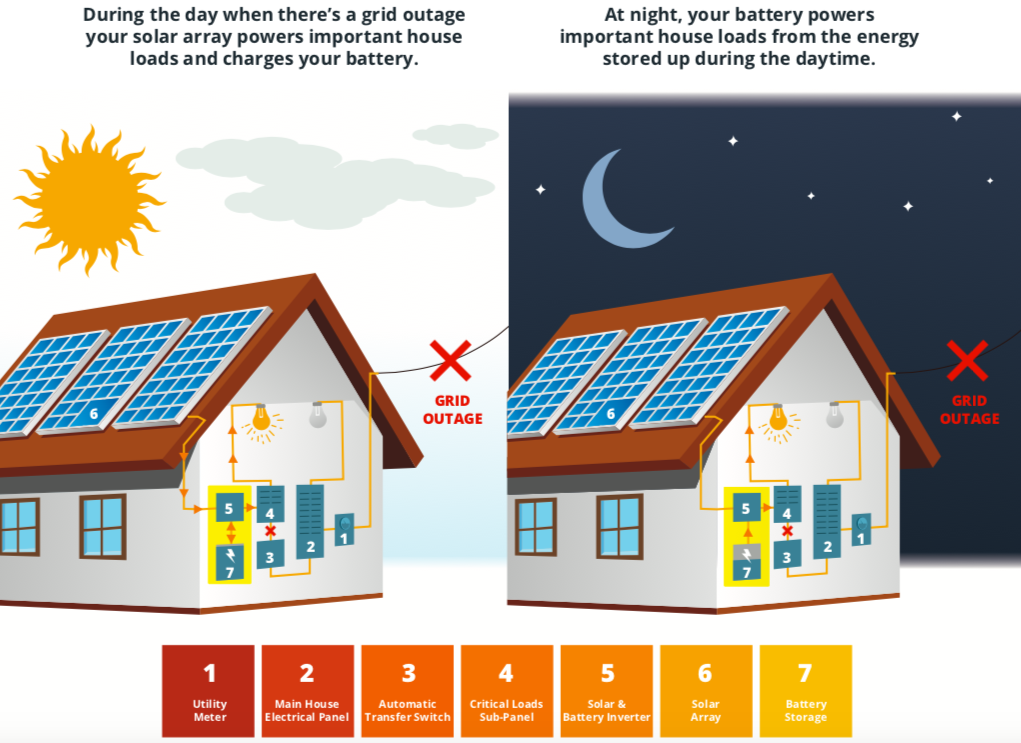
Most solar arrays are grid-tied, meaning they are connected to the local power grid. This allows solar homeowners to use their solar electricity when the sun is shining, and to switch seamlessly over to utility electricity on cloudy days or at night. For grid-tied solar arrays, it’s important to understand how a power outage will affect your solar panels and your home. Firstly, when the power grid goes down, your solar panels will automatically stop producing electricity. This is a required safety feature, designed to prevent your panels from feeding electricity onto the grid and injuring the utility linesmen who are servicing the wires. As a result, when the grid is down and your solar panels stop producing electricity, your home will not have power (even if the sun is shining).
If you want your solar panels to continue producing electricity even when the grid goes down, you will need to pair your solar array with batteries. This pairing – called solar + storage – allows your panels to produce electricity while remaining isolated from the grid, avoiding any safety issues. Your solar electricity will be stored in the batteries and can be consumed by your home when the grid is down, allowing your home to remain powered during a grid outage.
How much of your home can you power from batteries when the grid is down? How do your solar panels pair with batteries? For answers to all of these questions (and more!), download our free Battery Storage for Homeowners guide.
Energy payback is the amount of time it takes a solar panel to produce more energy than was used to produce it. This time varies by panel and by technology. Even as far back as 2004 when manufacturing processes were less efficient, it took less than four years for a standard solar panel to generate more energy than was used in making it. And remember, solar panels can generate electricity for 25 years or longer!
Most solar arrays don’t have batteries- yet. Most residential solar arrays in the United States remain grid-tied, meaning they’re connected to the utility electric grid. Grid-tied solar arrays are significantly less expensive than arrays with batteries. Standalone solar arrays are also more efficient than solar paired with storage. Batteries lose a small amount of their electrical charge as the current moves through them, making battery-paired solar arrays slightly less efficient that standalone solar.
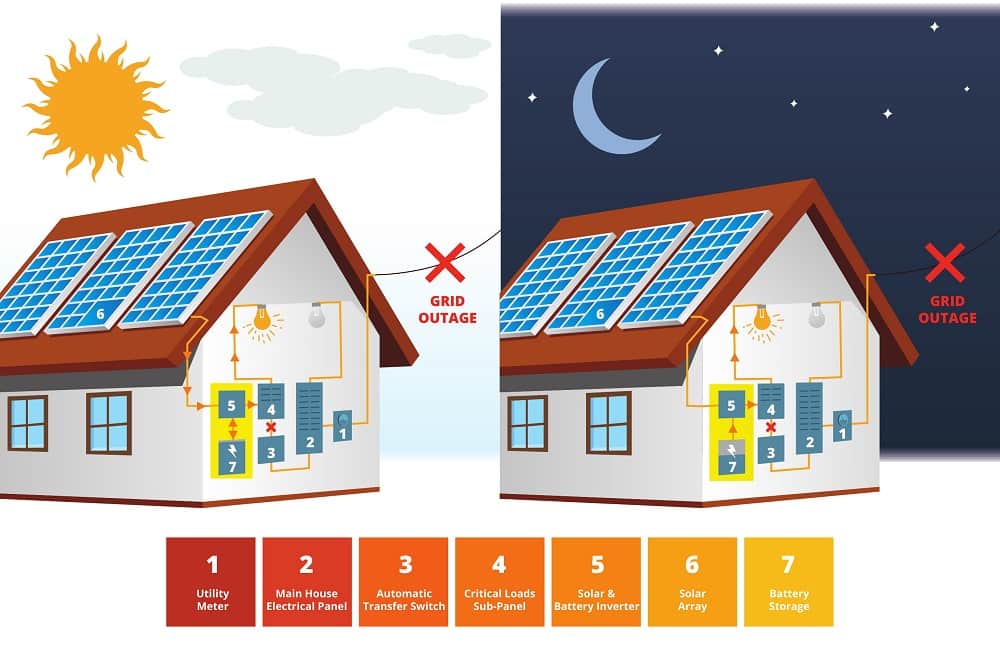
The primary value of batteries today is for backup power. Pairing your solar array with batteries allows you to power your electrical needs even when the utility grid is down. Luckily, power reliability in the United States is high and grid outages happen relatively infrequently. Regardless, the opportunity to power necessary or desirable electrical loads during grid outages makes battery storage an attractive investment for many Americans. At present, batteries still come with a premium price tag (see our Battery Storage Guide for Homeowners for pricing information), however many home and business owners are taking the storage leap in order to access the backup power value batteries can provide them. As new rate designs and economic opportunities arise that increase the value proposition of battery storage (ex: time of use rates that incentivize customers to store electricity when it’s cheap and use it when utility prices are high), battery economics will change. Solar United Neighbors is tracking these developments and will share them with our network once they become available.
Beyond the economics of battery storage, there are other technical considerations worth keeping in mind. Batteries take up room in your home, can require maintenance, and will likely need to be replaced at least once during the lifetime of your solar array. Additionally, and most importantly, there are different types of battery chemistries that affect how much energy you can store and draw upon during a grid outage. For more information on how batteries work, download our free Battery Storage for Homeowners guide.
Absolutely! Many home and business owners chose to go solar today – leveraging the immediate cost competitiveness of solar to start saving money on their electric bills – and install batteries in the future, once hardware costs fall. There is nothing that prevents you from adding battery storage to an existing solar array. This arrangement is called a “storage retrofit.” There are a few important hardware considerations (including whether to AC- or DC-couple the system, and the most appropriate battery inverter for the desired coupling configuration) and financing considerations (federal tax credit eligibility) for storage retrofits. We detail these considerations in our free Battery Storage for Homeowners guide. Download the guide today to learn more about retrofitting an existing solar array with batteries!
There are four factors that determine if your roof is a good fit for solar:
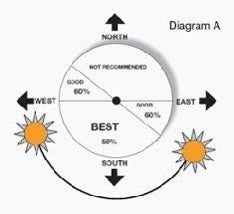 Orientation: Ideally, you should have a south-facing roof. In the northern hemisphere, south-facing roofs maximize the amount of sunlight your solar panels collect. The more sunlight they collect, the more electricity they produce, and the quicker you can pay off your system. You can still mount solar panels to your roof if it faces due east or west, but the panels will produce less energy (about 75% of what a south-facing roof would produce). If you have a flat roof, the panels can be engineered to face due south no matter how your roof is oriented.
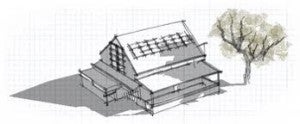
Shading: Once you’ve determined that your roof is oriented in the right direction, the next step is to ensure that your roof is not shaded. The portions of the roof where solar will be installed should be free of shade for most of the day, as shade can significantly reduce electricity production. Trees, chimneys, dormers, and HVAC vents are factors that can cause shading on a roof. If you’re not sure if your roof is shaded, your installer can use a tool called the “solar pathfinder” to figure out if trees or other objects will cast shade during the day.

Surface: Solar arrays are most efficient when they are installed in a large, uninterrupted space. Things like dormer windows, chimneys, vents, skylights, and air conditioning units can be obstacles to installing an array.
Durability: Finally, if your roof is more than 15 years old, you may want to consider replacing it before installing solar panels. Most solar vendors recommend using roofing material that will last as long as the system (minimum of 25 years).
A solar array will last at least 25 years. It’s important that the roof underneath it be in good shape. If your roof is more than 10 years old, you should have it evaluated to determine its remaining lifespan. You may want to consider repairs or replacement before installing solar. In some situations, work to improve the structural capacity of your roof to withstand a solar installation can be rolled into the federal tax credit. (Note: This only applies to structural upgrades, not re-roofing). IRS code is vague on the exact scope of roof work that can be rolled into the federal tax credit. We suggest you consult with a tax expert on the specifics of your roof.
It typically takes one to two months for an installer to design your solar array and secure initial permits (from your municipal government) and interconnection agreements (from your electric utility). Depending on your exact solar permitting office and utility interconnection team, this could take anywhere from a few weeks to a few months. Once initial permits and interconnection agreements are in hand, your installer will typically need only one to two days to physically install your array (panels, inverter, racking system, and wiring). The installer will then need to get final approval from the municipal permitting office and secure final interconnection approval from the utility. This can take an additional one to three months depending on the jurisdiction.
When choosing an installer, you’ll want to consider many criteria. We’ve distilled the most important into a comprehensive list below.
Experience: It’s important to assess the installer’s installation experience. How many installations have they completed? How many were systems similar to your own in size, design, and materials? In addition to installation experience, installers should be familiar with the permitting and interconnection procedures relevant to your property. How many installations have they completed in your jurisdiction and utility territory?
Reviews: When researching prospective installers, be sure to ask for customer references. How were other peoples’ experiences with the company? Consider checking online reviews at sites like Angie’s List and the Better Business Bureau.
Materials: With hundreds of manufacturers and products on the market, it can be hard to know what the best panel, inverter, and racking system is for your property. You’ll want to ask your installer what components they offer and what their experience has been with those manufacturers. Should you desire a specific type of material (an American-made panel, for example) you should express that preference upfront with your installer.
Labor warranty: Labor warranties cover the workmanship of the installer, most likely covering their electrical wiring and roof penetrations. These differ from installer to installer, so it’s important to know what each installer offers when choosing between companies. Be sure to ask if the warranty fully covers roof penetrations when researching labor warranties. Some installers do not offer that coverage under warranty. If having a robust, long-term labor warranty is important to you, ask your installer if they offer an option to upgrade to a longer warranty period.
Licensing and certifications: While no universal solar license exists, a leading industry certification to look for is NABCEP (North American Board of Certified Energy Practitioners). All installation crews should include at least one person who is NABCEP certified. This includes electricians. You should request a copy of your installer’s electrical and contracting license.
Source: GW Solar Institute
Solar installations come with three warranties: product warranties, power production warranties, and installation warranties.
Product warranties guarantee the physical integrity of your solar panels and inverters. For example, should a soldered connection on one of your panels fail (adversely affecting its electricity production), that panel would be replaced under the product warranty. Product warranties are offered through the manufacturer, not your installer.
For solar panels, most manufacturers offer a 10-year product warranty. Some high-end panel manufacturers offer longer product warranties, up to 25 years. Inverters come with product warranties that range from 10 to 25 years. Central (or string) inverter manufacturers offer 10- to 15-year product warranties, while microinverter manufacturers offer 25-year product warranties.
Next, the power production warranty guarantees that the solar panel will produce at least 80 percent of its nameplate capacity for a minimum of 25 years. Just like the product warranty, the power production warranty is offered by the panel manufacturer. While details vary from manufacturer to manufacturer, the power production warranty assures that your system will continue to produce power over its lifetime. In practice, identifying whether your system is experiencing a drop in performance that violates this warranty is difficult without the assistance of an installer. Despite that, production warranties serve as a proxy for the expected performance degradation of your solar panels over time.
Finally, the labor warranty covers the installer’s workmanship, including their electrical wiring work and any roof penetrations they make to attach your solar array to the roof. Unlike the product or power production warranties, the labor warranty is offered by your installer. Labor warranties vary among installers and regional markets. That said, they typically range from three to 10 years. Some installers will offer an option to upgrade to a longer labor warranty.
If you believe your solar system is experiencing problems, contact your installer directly. The majority of systems will be installed with an online monitoring program that tracks the production of your array. You can use the data in your monitoring system to verify if your system is still producing energy at the same rate as before. Note: Keep in mind that energy production fluctuates from day to day, month to month, and year to year based on weather conditions and other natural factors. Despite these fluctuations, you should see a consistent curve of energy production over time.
If you believe something is wrong with your system, contact your installer and send over any monitoring data you have. In some cases, installers will be able to view the production data themselves, and in others you’ll have to give them access to your monitoring system. Either way, they’ll be able to easily assess the problem and determine the best course of action. In extreme cases where the installer needs to dispatch a crew member to fix the problem, be sure to ask whether the costs are covered by their labor warranty.
Many states have passed legislation preventing HOAs from denying their members the right to install solar. However, HOAs may still be allowed to place restrictions on how and where solar is installed on your property. Check out state-specific information on HOA solar laws.
Regardless of HOA solar law, it’s a good idea to be upfront with your HOA about your solar installation plans. Let them know your installation date and share all relevant information (system size, number of panels, installation timeframe, etc.). Most installers provide a mock-up image of what the array will look like on your roof (or ground) once installed, and this can be a compelling resource to share with your HOA. If you encounter resistance from your HOA, join your state Solar United Neighbors list service and pose your challenge to the group. You’re likely not alone in facing HOA resistance, and others may be able to share their lessons learned. What’s more, let us know if you encounter HOA push-back. We can help you navigate the process and connect you with solar neighbors who have faced similar difficulties. We have also developed a guide to help homeowners change their HOA’s policies to be more solar-friendly.
Solar installations in historic districts typically must go through an additional step in the permitting process to ensure the location and method of installation comply with local historic requirements. (e.g., solar panels cannot be visible from the street). In some jurisdictions, this review is part of the standard permit review process. In others, it is handled by a separate historic review board. Your installer will be familiar with the requirements in your area. You should expect your installer to work with the relevant review body to secure the necessary permits. The cost for historic district permitting should be included in your solar contract.
Because solar permitting is handled by the local municipality, the permitting process will vary based on where you live. Most localities require installers to file for a solar permit, the stipulations of which differ by jurisdiction. Solar permits are in place to ensure that your system is installed safely and follows local code. From a customer perspective, you should not have to file any of the local permits yourself. Your installer should handle all permitting aspects themselves, including submitting the permit application and getting the solar system inspected.
Even before you install solar, reading your electric bill can be confusing. There are several charges and different line items to keep straight. Check out this guide explaining the different components of your bill and how to identify them each month.
Once you install solar, your monthly bill will look slightly different. Most notably, the bill will take into account “outbound energy,” or the solar electricity (kWh) you’ve exported to the grid in moments where it wasn’t needed at home. It’s important to be able to read your bill in order to verify that your utility company is accurately crediting you for your solar electricity. Click here for guidance about how to read your electric bill after going solar.
Typically, you are compensated for your solar production by net metering. Net Metering allows solar energy generators to offset their energy consumption with their energy production. When your solar panels produce more electricity than you’re using on site, the excess electricity is sent out to the local grid. When this happens, your electric meter runs backwards, crediting you for this contribution. When you’re using more electricity than your system is generating, your electric meter runs forward, pulling the necessary extra electricity from the grid. At the end of the month, your final electric utility bill is your total usage minus the electricity that your solar panels produced. For more information, see our guide on net metering.
While net metering is the primary policy that enables solar producers to be compensated, some states’ policies vary. To check the policy in your state, see DSIRE’s solar incentive database.
Source: GW Solar Institute
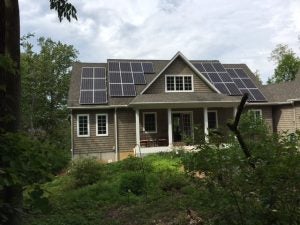 It is common for systems to produce more energy than a home consumes. This happens during the day when no one is home. However, it is uncommon for systems to be sized to produce more energy than you will consume over the course of a year. If you produce more energy than you consume on an annual basis, you will be compensated in different ways depending on the state policies in place. We do not recommend that you install a system that will produce more than 100 percent of your energy consumption, because you are often compensated for the excess electricity at a lower wholesale rate.
Several factors dictate the price of your system, not just the cost of the panels themselves. Other factors include the price of the inverter, racking equipment, and engineering time as well as design, labor, and permitting. Many of these components are soft costs that are not based on the price of physical equipment. Solar United Neighbors aims to reduce these costs so home and business owners can see more savings when going solar.
According to the Solar Energy Industries Association (SEIA) and Greentech Media Research (GTM), the average price for a residential solar installation is just below $3.00/watt. That means if you purchase a medium sized residential system of 5 kW, it would cost about $15,000. This does not factor in the federal tax credit or any additional incentives.
There are several factors that impact how much your solar system will cost. These include the size of your system and the equipment you use. Local factors will also influence the cost of solar. These factors include costs for permitting and the local cost of labor.
Your Installer will be able to walk you through several options depending on your budget and individual preferences. If you chose to finance your system, you may owe very little upfront and see savings right away.
When thinking about financing, it is important to consider the two ownership structures available when going solar: direct system ownership and third-party ownership. Direct ownership means you own your system outright and are eligible for all available incentives. Third-party ownership means another entity owns and operates the system. Each offers benefits. Which model is right for you will depend on individual preference.
Source: GW Solar Institute

Owning a system outright means you purchase the system upfront. This can be done either through a loan or with an upfront cash payment. Owning a system means you will retain the rights to all of the system’s additional incentives. This includes the federal tax credit. Direct ownership of a system makes sense if you are able to pay for the system upfront or are able to take out a loan.
If you’re planning to sell your home shortly after going solar, it may make sense to purchase the system. Owning the system outright makes it easy to transfer ownership of the panels to the new homeowners and to incorporate their price into the value of your home. Selling your home after going with a third-party ownership model is more complicated. To do so, you’ll need to pay off the remainder of the lease, effectively purchasing the system. If you don’t wish to pay off the system, the new home owners will have to agree to take over your current contract and pay off the remainder of the agreement themselves.
Financing a system you own: Modern financing mechanisms have made solar more affordable and available to anyone interested. When going solar there are several ways to finance a system that you own, including loans, Property Assessed Clean Energy programs, and other incentives.
Available incentives:
- Federal Tax Credit. The Energy Investment Tax Credit gives you a percent-based credit off the total cost of your solar system. This is calculated before other incentives. You still have to pay up front for the system. When you file your taxes, you will receive a credit (not a deduction) from the Federal Government. For systems installed by the end of 2019 the tax credit is 30%. The credit is 26% in 2020, 22% in 2021, and goes away after that. Learn more about the federal solar investment tax credit.
- Solar Renewable Energy Credits (SRECs). In some states, when you generate solar electricity from your system, you also generate an associated “green value” for your electricity. This is known as an SREC. Every time your system produces 1,000 kWh, or 1 MWh, of electricity, you get one SREC. These SRECs have a variable monetary value, like a company’s stock or commodity product, and, when sold on the open SREC market, can give you a revenue stream to help pay for your solar system. SREC prices are dictated by supply and demand of solar energy production and legislation called Renewable Portfolio Standards (RPS). Learn more about SRECs.
- USDA REAP (Rural Energy for America Program). REAP offers grants and loans to agricultural producers and small businesses in rural areas to install renewable energy systems. It also provides funding for energy efficiency improvements. Learn more about the REAP program.
- Additional Local Incentives. Several states and municipalities have developed additional incentives for those interested in installing solar: additional state tax or property tax credits, grants, rebates, and financing programs.
For a more comprehensive look at the incentives available in your state, see our state guides.
Third-party ownership means that a solar company will own and maintain the panels installed on your roof. As the homeowner, you simply purchase the power the panels produce through a power purchase agreement (PPA) or pay a fixed, monthly rate (lease) for the panels. PPAs and leases can offer a no-upfront payment alternative when going solar, while still saving you money. Typically, the price of solar is lower than your standard electricity price, so you will see savings right away. A PPA or lease contract typically runs 15 to 20 years, but will often include an option for the homeowner to purchase the system outright later in the contract term. In this model, the company that owns the system will take advantage of the federal tax credit and any other available local incentives.
Storage Technology
Battery banks in a home serve the same purpose as a traditional generator that runs on diesel, gasoline, propane, or natural gas. Unlike a traditional generator, a battery backup system does not require you to buy and store fuel or rely on fuel delivery during an outage. When paired with a solar array, the battery will be charged with the solar electricity you produce. If you do not pair your batteries with solar, the battery will charge and recharge only from utility-supplied grid electricity. This limits its usefulness for backup power purposes during a utility outage as it will only be able to discharge once before needing the utility grid to be restored for it to recharge.
Powering your entire home with a battery system can get expensive. This is why many homeowners install a smaller battery bank to power select “critical loads”, such as medical equipment or a refrigerator, in their home during the event of a grid outage. If you feel strongly about powering your entire home during an outage, a whole-house fossil fuel-powered generator may be more cost effective.
While these terms are often used interchangeably, they are two different parts of our electricity system. Energy is what the electrical loads in your home consume over time in order to operate. It is measured in Watt-hours (Wh). A thousand watt-hours equals one kilowatt-hour (kWh). It’s the total amount of (electrical) work that can be done, and it’s what we pay for every month on our electric bills.
Power, on the other hand, is instantaneous and measured in watts (W). One thousand watts equals one kilowatt (kW). It’s the ability to do (electrical) work in a given moment. For example, if you took a cup of tea and placed it in a 1000-watt microwave for two minutes it would be just as hot as if you’d placed it in a 2000-watt microwave for one minute. Each time you used the same amount of energy (kWh) to heat the tea.
The size of the battery bank you need depends on several factors and is specific to your needs and to your home. A qualified energy installer should look at the following to determine what you need:
1) What kinds of loads you would like to run while the power is out
Your installer should look at which appliances, lighting, and other loads you want to power in an outage in order to determine how much energy they will use over the time period you want to keep them running. To size your battery system, the installer will add up the required number of watt-hours per electrical load over the desired backup period and the maximum number of watts you’ll need at any given time during a backup period. Bigger loads like electric stoves, electric water heaters and whole-house air conditioners may not be able to be backed up.
2) Suitable space in or outside your home to place batteries
Depending on the type, batteries may need to be located inside or outside. If located outside, and depending on batter chemistry, they may need to be placed in a shaded, temperate area. Your installer might need to adjust the size of your battery system to accommodate your available space.
3) How long the batteries are able to run without being re-charged
A battery system that operates your appliances and lights for one day would be smaller than a system that can operate the same equipment for two days without being re-charged. Your installer will guide you through how long you want to be able to run your appliances, but for most battery backup systems the standard length of run time is one day, especially if you have solar on site to re-charge your batteries.
4) Your budget
Because batteries can be expensive, most people size their systems to only power critical electrical loads while utility service is out. Your installer will help you decide which loads you want to power with your battery given your budgetary constraints.
When you’re thinking about integrating battery storage and solar, there are two ways to do it: DC coupling and AC coupling.
DC coupling
DC (or “Direct Current”) coupled systems are most common when installing both solar and battery storage at the same time. In this setup, the solar electricity is fed directly into the battery system (in DC form) without the need for any conversion. Often in DC coupled systems, the battery and solar systems share one inverter. DC coupled systems also have an easier time ensuring that your battery is only charged by solar electricity (as opposed to utility electricity from the grid). This is important for qualifying for the federal tax credit.
AC coupling
AC (or “Alternating Current”) coupled systems are made up of a solar array and battery system that are independent of each other. The AC coupled configuration requires two inverters: one for the solar array (to convert the solar electricity from its natural DC form to AC so that it can flow directly into your home) and one for the battery (to convert the solar electricity back to DC so that it can be used to charge the battery). Typically, the energy produced from your solar system enters your house. Then, excess electricity not used by your home is stored in the battery.
When adding batteries to an existing solar array, many systems will be AC coupled. This is done to allow you to keep your existing solar inverter and wiring. You’ll add a second inverter in addition to your existing solar inverter. It’s important to note that AC coupled systems make it more difficult to guarantee your battery is exclusively charged by solar which is an important factor for federal tax credit eligibility.
There are several things that go into pricing out a battery storage system:
- Soft costs – installation, permitting, system design, labor
- Hardware costs – battery equipment, inverter, other electrical components
- Maintenance – visits from a qualified professional to ensure your system is operating properly
The cost of battery storage priced by an installer will include both soft costs and hardware costs and can range widely from ~$7000 to upwards of $20,000 because it is customized to the amount of energy a homeowner wants to power loads in their home during an outage.
In most places in the country installing battery storage will not make you any money because the electricity rate structures do not incentivize the storage of energy in the home. For most homeowners, battery storage is about backup power and being more resilient.

Want to learn more about how battery storage and its potential value in the future? Check out our full Battery Storage Guide.
Unlike solar, for which there are numerous loan financing options, the number of options available for storage are more limited. Typical options like home improvement loans and home equity lines of credit are available for use. Some solar loan providers, like Mosaic, offer financing for storage as well. If you have PACE (Property Assessed Clean Energy) financing available in your area, this may also be available for storage. In some areas third-party owned systems may also be available. Under these arrangements you get the use of the battery system for backup power and the battery owner uses it to provide grid services to the utility. This kind of arrangement is still very new and not yet widely available. Ask your installer about financing options they can offer from the manufacturer or from third-party financiers and compare them to what you can acquire on your own.
Lead acid batteries
Lead acid batteries are generally installed indoors because they have a preferred charging and discharging temperate range of 50°F – 80°F. While you can operate lead acid batteries outside of this temperature range, it will reduce the system’s lifespan and efficiency.
Lead acid batteries are also less energy dense than lithium ion systems. This means they will take up more space per installed kW or kWh unit. A single lead acid battery takes up about as much space as a shoebox. Multiple batteries are strung together to make a system large enough to power multiple loads in your home. Lead acid batteries must also be connected to a separate inverter, which must be wall-mounted.
Lithium-ion batteries
Lithium ion batteries have a much wider preferred temperature operating range, typically between 32°F – 100°F. Additionally, lithium ion systems are more energy dense than lead acid batteries and are typically contained in one singular unit. Depending on the manufacturer, Li-ion batteries may or may not contain an integrated inverter. This further reduces the space required for these types of systems.
With lithium ion’s wider temperature range and smaller footprint, some manufacturers have designed systems that can be installed outdoors, typically mounted on the side of your home near your electric meter or solar connection. If you live in a climate with extreme seasonal temperature swings, you may want to install the battery indoors to maximize operating efficiency and battery life.
The amount of space needed depends on how much storage you want and can afford to cover your needs while the grid is out. The chemistry also matters. Sealed lead acid batteries can take up more space and require a custom or pre-made cabinet. Lithium ion batteries are pre-wired and often come in a wall or floor-mounted enclosure or cabinet. Another important factor is where your critical loads sub-panel will be located. This is the electric panel that will contain all the circuits in your home that will be powered by the battery bank when the power is out.
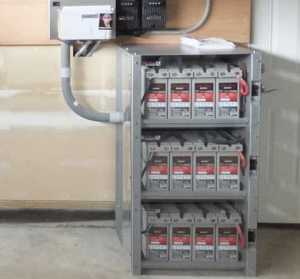
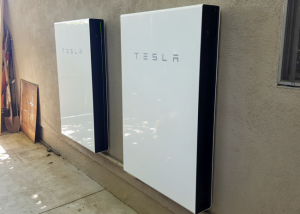
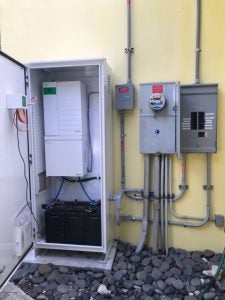
Smart inverters are a vital – yet overlooked – piece of the battery storage system. Smart inverters have the ability to manage when and how your batteries run. All battery storage systems require an inverter and will be programmed to run based on your preferences and needs.
Some batteries come with an integrated smart inverter, designed to give the battery owner more programming control over when and how their battery is used. As opposed to standard inverters that are programmed to work in a predictable, static manner, smart inverters can be programed via mobile apps and web portals to run when it makes the most sense, given physical, financial, or owner-preference signals. If your utility offers a rate structure that allows storage to provide you economic value, batteries can be programed with their smart inverter to take advantage of these rates. However, in most utility territories there is not yet an economic incentive for storage and storage is only used for backup power.
Warranties for batteries take two forms: number of guaranteed operational years or number of guaranteed cycles. A “cycle” refers to the battery being discharged and then re-charged. The number of cycles used in a given year will depend on how you operate your storage system. For instance, if your system is only used to provide backup power during grid outages, you may only cycle your batteries a few times a year. However, if you configure your storage system to maximize self-consumption of any solar electricity you produce, your storage system may cycle once a day. On average, lithium ion batteries are under warranty for 10 years or for 7,500 to 10,000 cycles. Lead acid batteries are under warranty for much less time, typically 2 to 5 years.
Your local permitting office will have requirements for how your battery system should be installed. Your installer is responsible for reaching out to them and securing the necessary permits. Because battery systems are relatively new, some local permitting jurisdictions may not have updated their code requirements to include residential battery storage. If there are hurdles along the way, your installer should help navigate through this process.
Some utilities may require interconnection review and approval for battery systems in addition to permitting by the local jurisdiction. Interconnection is the approval process you go through to connect an electrical resource to the electric grid. It is unclear whether utilities will require this step for systems used for battery backup purposes only when the grid is out. This is because residential battery systems are still relatively uncommon and can be used for many different things. This includes providing services to the grid while the grid is working. You can work with your installer to identify your utility’s requirements.
When looking for an installer for battery storage, it’s important to consider their background, experience, and qualifications. Here are a few things you should look for:
- Experience in your area (number of battery installs)
- Experience with the specific technology/equipment you are interested in
- Availability of equipment
- Access to your preferred equipment (if you have a preference)
- Installer workmanship warranties
- NABCEP certification, a common certification for solar installers that includes battery backup knowledge as well
A thorough battery proposal should contain:
- Full cost of the storage system, installation, and additional equipment
- Payment milestones
- Equipment details
- Battery size (kW and kWh)
- Battery model and manufacturer
- Inverter model and manufacturer (if separate from battery)
- Battery management system (if used)
- Critical load sub-panel size and cost
- List of all warranties (battery, inverter, installer workmanship)
- Details of additional work needed (electrical work, inverter swap, etc.)
- Pricing guarantee for all equipment
- Installer information (office location, point of contact, contact information)
Just as we recommend with solar, it’s a good idea to let your insurer know that you plan on installing a battery system. This way, your system can be added as an additional appliance in your home that is covered. Installing battery storage should not change your insurance payments.

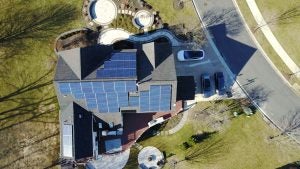 If you lease the system, you may have a few options depending upon your lease agreement. It may be possible to transfer your lease as part of the home sale. Or you may have to pay off your lease before selling your home. You can then include the cost of this pay-off in your home’s sale price.